iPads & iPods:
The Technical Side
iPad Set-up: Staff Devices Only
Once again, and hopefully for the last time, the way our office manages staff iPads has changed. As a result, when you pick up your iPad from the tech office and turn it on, it will be like a brand new iPad just out of the box. You will need to walk through the set-up process. Most of it is self-explanatory, but below are a few tips relating to specific settings we would like to make sure you turn on and modify:
Enable Location - We are asking you to turn this feature on so the app Find My iPhone, which also works for iPads, can be installed on your device.
Set-up as New iPad - Although devices can be restored from a previous back-up, you will be setting your iPad up as a new iPad.
iCloud - Turning on iCloud during the initial set-up is at your discretion. Regardless of your selection, you can always change this setting later through your settings app.
Diagnostic - We are asking that you select the Auto Send Diagnostics feature, so Apple will be notified of any issues with your device. This is helpful if your device needs to be mailed in for repairs in the future.
Once you have completed the initial set-up, please complete the following steps:
- Go to Settings
- Select General
- Tap About
- Tap Name
- Change the name to Your Building Initials & Your Name (Example: LHS Lehman OR LHS Gwen Lehman)
- Now go to WiFi (also in settings)
- Change from Guest to Staff - if your device does not connect to the Staff WiFi, please notify the tech office
iPad Skills Checklist
Download this checklist and see what tasks you are able to complete already and which ones you need to learn how to accomplish. Checklist originated by Sean Hampton-Cole
| ipad-skills-checklist.pdf |
Tutorials, Tips & Tricks
iPad/iPod Tutorials - Collection of articles
The Complete List of iPad Tips, Tricks, and Tutorials - Just what it says from How-To Geek
Top 10 Tips & Tricks - YouTube video includes Copy/Paste, Easy Mute, Digital Photo Frame, Taking Screen Shots, Web Page Scrolling, Moving Apps, Caps Lock On, Close Running Apps, Magic Apostrophe and Street View in Maps (narrator talks fast so you might want to pause or replay the video)
45 Problems with iOS 7.1, and How to Fix Them - List of issues with the 7.1 operating system on the iPad 2+ and how to fix those issues
Saving to the Clipboard
Sometimes when you are using apps, you get the option to "Save to the Clipboard." So you click save and then wonder where is the clipboard? How do I access what I just saved? What "Save to the Clipboard" really means on the iPad is Copy. So to retrieve what you copied, you have to go to another app on the iPad and click Paste. This will take the item on the clipboard and copy it into the new app, like Notes. However, the clipboard can only store one copied item at a time. If you 'Save to the Clipboard' twice in a row without pasting, then you lost the first item. When you go to paste you will only get the most recent item you saved.
Sometimes when you are using apps, you get the option to "Save to the Clipboard." So you click save and then wonder where is the clipboard? How do I access what I just saved? What "Save to the Clipboard" really means on the iPad is Copy. So to retrieve what you copied, you have to go to another app on the iPad and click Paste. This will take the item on the clipboard and copy it into the new app, like Notes. However, the clipboard can only store one copied item at a time. If you 'Save to the Clipboard' twice in a row without pasting, then you lost the first item. When you go to paste you will only get the most recent item you saved.
Sharing files between the iPad/iPod and a computer
How to copy files from your Mac to an iPad using File Sharing
1. Connect your computer to the iPad using the USB cable
2. Launch iTunes on the computer
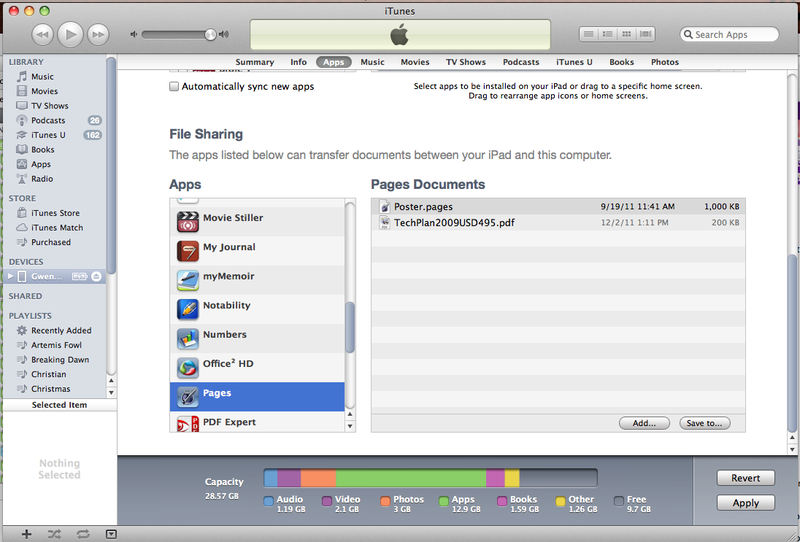
3. In the Devices section of the left-hand menu on iTunes select iPad
4. Click on the Apps tab and scroll to the bottom of the page. If you have any apps on your iPad that support file sharing you will see the screen below
5. In the File Sharing section you can see a list of apps that support file sharing on your iPad. Click on an app and you will see a list of the documents for that app on your iPad
6. To copy a file from your computer to the iPad, simply drag and drop it into the document list. Alternatively, click on the Add button at the bottom of the iTunes window and browse to the file on your computer, then select it
7. The file will be copied to your iPad. It can only be viewed and edited from within the application to which it was copied, however
How to copy files from an iPad to your Mac using File Sharing
1. Connect your computer to the iPad using the USB cable
2. Launch iTunes on the computer
3. In the Devices section of the left-hand menu on iTunes select iPad
4. Click on the Apps tab and scroll to the bottom of the page. If you have any apps on your iPad that support file sharing you will see the screen below
5. In the File Sharing section you can see a list of apps that support file sharing on your iPad. Click on an app and you will see a list of the documents for that app on your iPad
6. To copy a file from an iPad to your computer, simply drag and drop it from the document list onto the Desktop or another folder. Alternatively, click on the Save to... button and save the file to any location
(Source: "How to share files between the Apple iPad and a computer - Know Your Cell." Know Your Cell - Cell phone news, reviews, features, guides and more - Know Your Cell. N.p., n.d. Web. 8 Mar. 2012. <http://www.knowyourcell.com/apple/apple-ipad/ipad-guides/458095/how_to_share_files_between_the_apple_ipad_and_a_computer.html>.)
How to copy files from your Mac to an iPad using File Sharing
1. Connect your computer to the iPad using the USB cable
2. Launch iTunes on the computer
3. In the Devices section of the left-hand menu on iTunes select iPad
4. Click on the Apps tab and scroll to the bottom of the page. If you have any apps on your iPad that support file sharing you will see the screen below
5. In the File Sharing section you can see a list of apps that support file sharing on your iPad. Click on an app and you will see a list of the documents for that app on your iPad
6. To copy a file from your computer to the iPad, simply drag and drop it into the document list. Alternatively, click on the Add button at the bottom of the iTunes window and browse to the file on your computer, then select it
7. The file will be copied to your iPad. It can only be viewed and edited from within the application to which it was copied, however
How to copy files from an iPad to your Mac using File Sharing
1. Connect your computer to the iPad using the USB cable
2. Launch iTunes on the computer
3. In the Devices section of the left-hand menu on iTunes select iPad
4. Click on the Apps tab and scroll to the bottom of the page. If you have any apps on your iPad that support file sharing you will see the screen below
5. In the File Sharing section you can see a list of apps that support file sharing on your iPad. Click on an app and you will see a list of the documents for that app on your iPad
6. To copy a file from an iPad to your computer, simply drag and drop it from the document list onto the Desktop or another folder. Alternatively, click on the Save to... button and save the file to any location
(Source: "How to share files between the Apple iPad and a computer - Know Your Cell." Know Your Cell - Cell phone news, reviews, features, guides and more - Know Your Cell. N.p., n.d. Web. 8 Mar. 2012. <http://www.knowyourcell.com/apple/apple-ipad/ipad-guides/458095/how_to_share_files_between_the_apple_ipad_and_a_computer.html>.)
Moving your iMovie videos from the iPad to your computer
